LACE UP
A dress-up kit design where children can make their own accessories
In my Soft Goods class at RISD, I had been exploring different ways of creating forms and objects using fabrics. During these exercises, I realized just how different the considerations for designing with soft materials are compared to more rigid materials.
At the same time, I was looking at children's building sets and noticed that almost all construction toys use rigid materials like wood, plastic, metal or foam.

I decided to make a construction kit with soft materials for children to make their own clothes and accessories.
I started by exploring different forms you can create with origami. I was looking at old exercises in paper folding and fabric origami that I had done for a different class and started trying to recreate those and other interesting forms with fabric and rope.


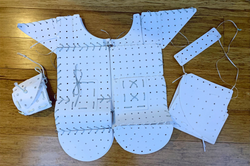
I started sketching different ideas and making prototypes with paper and using ribbon as connectors. I laser cut a lot of 'standard' shapes and started seeing what I could make with them. I started coming up with a set of pieces that could be used to create various objects such as a bag, a jacket, a skirt or a hat. For this project, I focused on creating the parts needed to make a purse.
 ideas for pieces |  some starting studies |  paper and ribbon prototypes |
|---|---|---|
 explorations with felt and rope |
My prototype was created by sandwiching felt between pieces of colored cotton fabric. I laser cut the fabric pieces and sewed them together before hammering in the colored grommets. I used a black rope to mimic shoelaces as the connectors. I experimented with colored grommets and fabrics to create various patterns. I layered fabrics to give the pieces structure while keeping them flexible. Here are some pictures of my first prototype.
 IMG_0048 copy.jpg |  IMG_0047.jpg |  IMG_0062 copy.jpg |
|---|---|---|
 IMG_0051.jpg |  IMG_0058 copy.jpg |
While I was considering my previous version as a trial piece, I got feedback that people really liked the colors and material. Hence, for my final piece, I kept those the same and just improved my craftsmanship. I also created intentional patterns with the grommets and used standardized black shoelaces. I made some minor adjustments and changed the lacing pattern. Here are some pictures of its fabrication steps starting from laser cut fabric and ending in an assembled bag.
 paper template |  Laser cut fabric pinned |  Stitching the edges |
|---|---|---|
 felt inserted and hand sewn closed |  Pieces after grommets were added |  lacing it together |
 inside the bag |  you can keep your stuff |  Final bag opened |
 final bag closed |
Here is a video of me assembling the final purse as well as the instruction booklet with the required instructions
In general, I got a lot of interest in my project. People were talking about the possibility of including different types of materials and textures and even adding colored shoelaces and other fun attachments. However, since I haven't had the chance to test this with children, there was concern around how they would interact with it.
Based on the feedback I received on the project, I would like to test the product with children. I need to find out what age children are best suited for this toy ( I was tentatively looking at 5 to 10 years of age ) and give them enough pieces to play with and observe how they interact with it.
I also need to explore further how the pieces can be standardized to work with different designs so children have the opportunity to create what they want and aren't restricted to the parts in the kit.
